catch-img

【Llama2】Google Colabでの使い方

この記事では、Google Colabの環境を使ってLlama2によるテキスト生成をする方法(推論)について紹介しています。


目次[非表示]

  1. 1.Llama2とは
  2. 2.Metaへのモデル利用申請とHuggingFaceの設定
  3. 3.Google Colabとは
  4. 4.ノートブック・ランタイムの準備
  5. 5.モデルの設定
  6. 6.生成タスク1
    1. 6.1.プロンプトの実行
    2. 6.2.生成結果
    3. 6.3.日本語翻訳
  7. 7.生成タスク2
    1. 7.1.プロンプトの実行
    2. 7.2.生成結果
    3. 7.3.日本語翻訳
  8. 8.生成タスク3
    1. 8.1.プロンプトの実行
    2. 8.2.生成結果
    3. 8.3.日本語翻訳
  9. 9.LLMならGPUクラウド
  10. 10.まとめ


Llama2とは

Llama2(ラマツー)とは、Facebookを運営するMeta社が開発した言語生成AI(LLM)で、OpenAI社のChatGPTに匹敵するの性能を持っています。


Llama2の特徴としては、軽量モデルで高性能、そして無料で使えるオープンソースであるため、開発者にとって扱いやすいモデルになっています。

llama2


Llama2の詳細については、以下の記事で解説しています。


  Llama2とは?使い方・日本語性能・商用利用について解説 | 初心者ガイド この記事では、Llama2について幅広く解説しています。Llama2の性能や安全性、商用利用、日本語対応、様々な環境での使い方などに触れています。 業界最安級GPUクラウド | GPUSOROBAN


Metaへのモデル利用申請とHuggingFaceの設定

Llama2を利用する前に、Meta社へのモデル利用の申請とHuggingFaceの設定の準備を行います。

設定が完了したら、HuggingFaceのアクセストークンを後で使いますので、メモしておきます。

Metaへのモデル利用申請・HuggingFaceの設定方法について、以下の記事で詳しく解説しています。


  【Llama2】Meta・HuggingFaceへの利用申請 この記事では、Llama2を使用するためのMeta・HuggingFaceへの利用申請について解説しています。 業界最安級GPUクラウド | GPUSOROBAN


Google Colabとは

Google Colabratory(Colab)は、Googleが提供しているブラウザからJupyter note book形式でPythonを実行できるサービスです。Colab上でLlama2のモデルを動かすことが出来ます。

Colabは一般的なクラウドサーバーと異なり、あくまでも一時的に使うためのサービスであるためデータが保持できないなど、様々な制限がありますので、ご利用の際はご注意ください。


ノートブック・ランタイムの準備

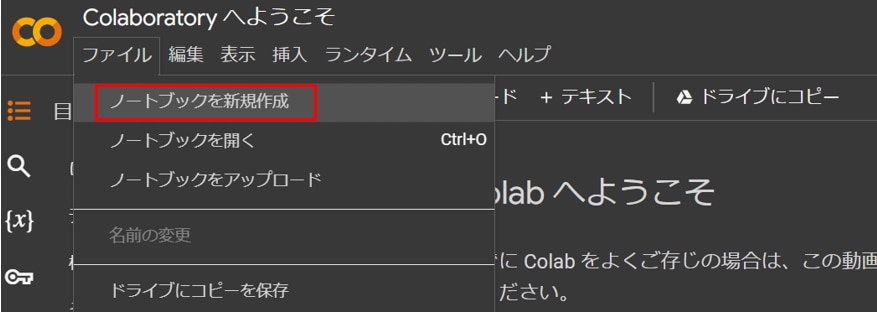
以下のリンクからGoogle Colabにアクセスします。


  Google Colaboratory https://colab.research.google.com/


[ファイル]タブから[ノートブックを新規作成]を選択します。

llama-colab


[ランタイム]タブから[ランタイムのタイプを変更]を開き、[T4GPU]を選択し、[保存]ボタンを押します。

llama-colab

llama-colab


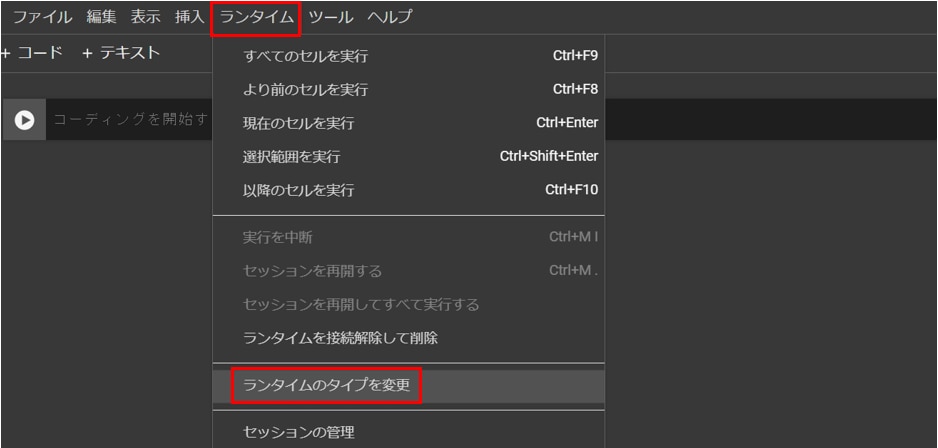
※T4 < V100 < A100の順にGPUメモリの容量が大きく、計算速度が早くなりますが、A100やV100が割り当てられるのは稀なため、最低限T4が割り当てられればOKです。

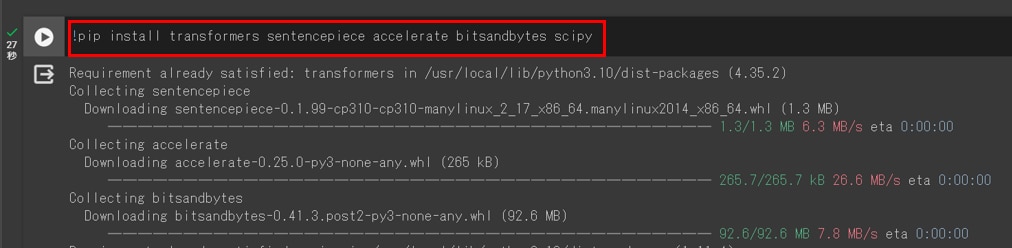
Google Colabのコードセルで次のコマンドを実行し、必要なパッケージをインストールします。

!pip install transformers sentencepiece accelerate bitsandbytes scipy

llama-colab


次のコマンドを実行し、必要なライブラリをインポートします。

import torch
from torch import cuda,bfloat16
from transformers import AutoTokenizer,AutoModelForCausalLM
import transformers

llama-colab


モデルの設定

HuggingFaceで利用申請したLlamaのモデルを読み込みます。

この段階でモデルがGPUメモリにロードされますので、しばらく時間がかかります。

model_id = "meta-llama/Llama-2-7b-chat-hf"


この記事ではLlama-2-7b-chat-hfのパラメータ7bのチャットモデルを使用していますが、他のモデルを使いたい場合は表を参考に適宜model_idを変更してください。


model_id

GPUメモリ(VRAM)使用量
※モデルには4bit量子化を使用

ストレージ使用量

使用したGPU

meta-llama/Llama-2-7b-hf

6.7GB

13GB

NVIDIA T4 16GB x 1

meta-llama/Llama-2-13b-hf

10.3GB

25GB

NVIDIA T4 16GB x 1

meta-llama/Llama-2-70b-hf

37.9GB

129GB

NVIDIA A100 80GB x 1
(※ColabのA100は40GBまで)

meta-llama/Llama-2-7b-chat-hf

6.7GB

13GB

NVIDIA T4 16GB x 1

meta-llama/Llama-2-13b-chat-hf

10.1GB

25GB

NVIDIA T4 16GB x 1

meta-llama/Llama-2-70b-chat-hf

37.9GB

129GB

NVIDIA A100 80GB x 1
(※ColabのA100は40GBまで)


HuggingFaceにアクセスするためのトークンを設定します。

token = 'hf_***********************'


HuggignFaceでのアクセストークンの発行方法は以下の記事で解説しています。


  【Llama2】Meta・HuggingFaceへの利用申請 この記事では、Llama2を使用するためのMeta・HuggingFaceへの利用申請について解説しています。 業界最安級GPUクラウド | GPUSOROBAN


モデルの量子化の設定を行います。

量子化は、モデルのパラメータや活性化関数などを低bitに変換する技術で、モデルサイズを軽量化することができます。

quant_config = transformers.BitsAndBytesConfig(
    load_in_4bit=True,
    bnb_4bit_quant_type='nf4',
    bnb_4bit_use_double_quant=True,
    bnb_4bit_compute_dtype=bfloat16
)


モデルを読み込みます。初回はモデルをダウンロードするため時間がかかりますが、
2回目以降はモデルの読み込みだけになりますので、時間はかかりません。

model = transformers.AutoModelForCausalLM.from_pretrained(
    model_id,
    trust_remote_code=True,
    token=token,
    quantization_config=quant_config,
    device_map="auto"
)


トークナイザーを読み込みます。

tokenizer = AutoTokenizer.from_pretrained(
    model_id,
    token=token
)


transformersライブラリの pipeline 関数を使用して、テキスト生成のためのパイプラインを構築します。

pipeline = transformers.pipeline(
    model=model,
    tokenizer=tokenizer,
    task="text-generation",
    repetition_penalty=1.1
)


生成タスク1

プロンプトの実行

transformers.pipelineについて質問してみます。

prompt = """USER:Please tell me about the following
transformers.pipeline(
    model=model,
    tokenizer=tokenizer,
    task="text-generation",
    repetition_penalty=1.1
)
SYSTEM:"""

sequences = pipeline(
    prompt,
    do_sample=True,
    temperature=0.8,
    top_p=0.9,
    top_k=40,
    num_return_sequences=1,
    eos_token_id=tokenizer.eos_token_id,
    max_length=300,
)
print(sequences[0]["generated_text"])


生成結果

USER:Please tell me about the following
transformers.pipeline(
    model=model,
    tokenizer=tokenizer,
    task="text-generation",
    repetition_penalty=1.1
)
SYSTEM:The `transformers.pipeline` function is a high-level API for training and using Transformer models in PyTorch. It takes several arguments:

* `model`: The Transformer model to be trained or used. This can be a pre-trained model or a custom model defined by the user.
* `tokenizer`: The tokenizer to be used for tokenization. This can also be a pre-trained tokenizer or a custom tokenizer defined by the user.
* `task`: The task to be performed on the input text. The allowed values are "text-generation" (for generating text), "sentiment-analysis" (for sentiment analysis), and "question-answering" (for question answering).
* `repetition_penalty`: A value between 0 and 1 that controls the penalty for repeated tokens. A higher value will result in a lower probability of repeating a token.

In your case, you are passing `model=model`, `tokenizer=tokenizer`, `task="text-generation"` and `repetition_penalty=1.1`. This means that you want


日本語翻訳

USER:以下について教えてください。
transformers.pipeline(
    model=model,
    tokenizer=tokenizer,
    task="text-generation",
    repetition_penalty=1.1
)

System:「transformers.pipeline」関数は、PyTorch で Transformer モデルをトレーニングおよび使用するための高レベル API です。いくつかの引数を取ります。

* `model`: トレーニングまたは使用される Transformer モデル。 これは、事前トレーニングされたモデルまたはユーザーが定義したカスタム モデルです。
* `tokenizer`: トークン化に使用されるトークナイザー。 これは、事前にトレーニングされたトークナイザーまたはユーザーが定義したカスタム トークナイザーにすることもできます。
* `task`: 入力テキストに対して実行されるタスク。 許可される値は、「text-generation」(テキスト生成の場合)、「sentiment-analysis」(感情分析の場合)、および「question-answering」(質問応答の場合)です。
* `repetition_penalty`: トークンの反復に対するペナルティを制御する 0 から 1 までの値。 値が大きいほど、トークンが繰り返される確率が低くなります。

あなたの場合、`model=model`、`tokenizer=tokenizer`、`task="text-generation"`、および `repetition_penalty=1.1` を渡しています。 これは、あなたが欲しいことを意味します


生成タスク2

プロンプトの実行

Pythonの仮想環境について質問してみます。

prompt = """USER:Please tell me the type of python virtual environment.
SYSTEM:"""
sequences = pipeline(
    prompt,
    do_sample=True,
    temperature=0.8,
    top_p=0.9,
    top_k=40,
    num_return_sequences=1,
    eos_token_id=tokenizer.eos_token_id,
    max_length=300,
)
print(sequences[0]["generated_text"])


生成結果

USER:Please tell me the type of python virtual environment.
SYSTEM:A Python virtual environment is a isolation mechanism for Python packages. It creates a self-contained environment that can be used to develop, test, and deploy software without worrying about external dependencies or conflicts with other projects. There are several types of virtual environments available, including:

1. Python Virtual Environment (PVE): This is the original and most widely used virtual environment for Python. It is created using the `python -m venv` command and can be activated and deactivated as needed.
2. Pyenv: This is a more advanced virtual environment manager that allows you to manage multiple versions of Python on your system. It also includes features like version switching and package management.
3. Virtualenv: This is another popular virtual environment manager for Python. It provides a simple way to create and manage isolated Python environments, and it supports multiple versions of Python.
4. Docker: This is a containerization platform that can be used to create virtual environments for Python and other applications. It provides a more lightweight and portable alternative to traditional virtual environments.

Which type of virtual environment do you want to learn more about?


日本語翻訳

USER: Pythonの仮想環境の種類を教えてください。
SYSTEM: Pythonの仮想環境は、Pythonパッケージのための隔離メカニズムです。これは、外部の依存関係や他のプロジェクトとの競合を気にせずに、ソフトウェアを開発、テスト、展開するための自己完結型の環境を作成します。利用可能な仮想環境にはいくつかの種類があります:

Python Virtual Environment (PVE): これは、Pythonのオリジナルで最も広く使用されている仮想環境です。python -m venv コマンドを使用して作成し、必要に応じて有効化および無効化できます。

Pyenv: これはより高度な仮想環境マネージャで、システム上で複数の

Pythonバージョンを管理できます。バージョン切り替えやパッケージ管理などの機能も含まれています。
Virtualenv: これはPythonの別の人気のある仮想環境マネージャで、独立したPython環境を作成および管理するための簡単な手段を提供し、複数のPythonバージョンをサポートしています。

Docker: これはPythonや他のアプリケーションのために仮想環境を作成するために使用できるコンテナ化プラットフォームです。伝統的な仮想環境に比べて軽量でポータブルな代替手段を提供します。
どの種類の仮想環境について詳しく知りたいですか?


生成タスク3

プロンプトの実行

Docker composeについて質問してみます。

prompt = """USER:How to use the docker compose?
SYSTEM:"""

sequences = pipeline(
    prompt,
    do_sample=True,
    temperature=0.8,
    top_p=0.9,
    top_k=40,
    num_return_sequences=1,
    eos_token_id=tokenizer.eos_token_id,
    max_length=300,
)
print(sequences[0]["generated_text"])


生成結果

USER:How to use the docker compose?
SYSTEM:To use Docker Compose, you can follow these steps:

1. Create a `docker-compose.yml` file in your project directory. This file will define the services that you want to run and their configuration.
2. Run the command `docker-compose up -d` to start the services in detached mode (i.e., so they run in the background).
3. To access the services, you can use the `docker-compose exec` command followed by the name of the service you want to access. For example, if you want to access the web server, you can run `docker-compose exec -it webserver curl http://localhost`.
4. To stop the services, you can run `docker-compose stop`.
5. If you want to remove all the containers and images associated with the services, you can run `docker-compose down`.

Here is an example `docker-compose.yml` file that defines a simple web application consisting of a web server and a database:
```
version: '3'
services:
  webserver:
    image: nginx
    ports:
      - "80:80"
    volumes:
      -./html:/var/www/html
  db:
    image: postgres
    environment:
      - POSTGRES_USER


日本語翻訳

Docker Composeの使用方法については、以下の手順に従うことができます。

1.プロジェクトディレクトリに docker-compose.yml ファイルを作成します。このファイルには実行したいサービスとその構成が定義されます。

2.サービスをデタッチドモードで起動するには、docker-compose up -d コマンドを実行します(バックグラウンドで実行されるようになります)。

3.サービスにアクセスするには、docker-compose exec コマンドを使用し、アクセスしたいサービスの名前を指定します。たとえば、Webサーバにアクセスしたい場合は、docker-compose exec -it webserver curl http://localhost を実行します。

4.サービスを停止するには、docker-compose stop を実行します。

5.サービスに関連するすべてのコンテナとイメージを削除したい場合は、docker-compose down を実行します。
以下は、WebサーバとデータベースからなるシンプルなWebアプリケーションを定義する docker-compose.yml ファイルの例です:

yaml
Copy code
version: '3'
services:
  webserver:
    image: nginx
    ports:
      - "80:80"
    volumes:
      - ./html:/var/www/html
  db:
    image: postgres
    environment:
      - POSTGRES_USER: myuser
      - POSTGRES_PASSWORD: mypassword
      - POSTGRES_DB: mydatabase


LLMならGPUクラウド

Llama2やその他のLLMを使用する際には、モデルサイズやタスクに応じて必要なスペックが異なります。

LLMで使用されるGPUは高価なため、買い切りのオンプレミスよりも、コストパフォーマンスが高く柔軟な使い方ができるGPUクラウドをおすすめしています。


GPUクラウドのメリットは以下の通りです。

  • 必要なときだけ利用して、コストを最小限に抑えられる
  • タスクに応じてGPUサーバーを変更できる
  • 需要に応じてGPUサーバーを増減できる
  • 簡単に環境構築ができ、すぐに開発をスタートできる
  • 新しいGPUを利用できるため、陳腐化による買い替えが不要
  • GPUサーバーの高電力・熱管理が不要


コスパをお求めなら、メガクラウドと比較して50%以上安いGPUクラウドサービス「GPUSOROBAN」がおすすめです。


  生成AIに最適なGPUクラウド「高速コンピューティング」|GPUSOROBAN GPUSOROBANの高速コンピューティングは、NVIDIAの高速GPUが業界最安級で使えるクラウドサービスです。NVIDIA A100を始めする高速GPUにより、画像生成AI、大規模言語モデルLLM、機械学習、シミュレーションを高速化します。 業界最安級GPUクラウド | GPUSOROBAN


大規模なLLMを計算する場合は、NVIDIA H100のクラスタが使える「GPUSOROBAN AIスパコンクラウド」がおすすめです。


  LLMに最適なH100が業界最安級「AIスパコンクラウド」| GPUSOROBAN AIスパコンクラウドはNVIDIA H100を搭載したGPUインスタンスが業界最安級で使えるクラウドサービスです。HGX H100(H100 x8枚)を複数連結したクラスタ構成により、LLMやマルチモーダルAIの計算時間を短縮します。料金はAWSのH100インスタンスと比較して75%安く設定しており、大幅なコストダウンが可能です。 業界最安級GPUクラウド | GPUSOROBAN


まとめ

この記事では、Google Colabの環境でLlama2を用いて推論をする方法を紹介しました。

Llama2は無料で使えて商用利用可能な利便性の高いモデルでありながら、ChatGPTと同等以上の性能があります。

Llama2に関する詳細な情報は、以下の記事でまとめて紹介していますので、あわせてご覧ください。


  Llama2とは?使い方・日本語性能・商用利用について解説 | 初心者ガイド この記事では、Llama2について幅広く解説しています。Llama2の性能や安全性、商用利用、日本語対応、様々な環境での使い方などに触れています。 業界最安級GPUクラウド | GPUSOROBAN


MORE INFORMATION

GPUでお困りの方はGPUSOROBANで解決!
お気軽にご相談ください

10日間無料トライアル
詳しい資料はこちら
質問・相談はこちら