catch-img

【Llama2】ファインチューニング | 7b・13b・70b

この記事ではLlama2のモデルをファインチューニングする方法を解説しています。


目次[非表示]

  1. 1.Llama2とは
  2. 2.Llama2のファインチューニング
  3. 3.ファインチューニングにはGPUが必要
  4. 4.Metaへのモデル利用申請とHuggingFaceの設定
  5. 5.実行環境
  6. 6.必要なパッケージをインストール
  7. 7.Jupyter Labを起動
  8. 8.必要なライブラリをインポート
  9. 9.モデルの読み込み
    1. 9.1.​​​​​​​Llama-2-7b-hfの場合
    2. 9.2.Llama-2-13b-hfの場合
    3. 9.3.Llama-2-70b-hfの場合
  10. 10.データセットの読み込み
  11. 11.ベースモデルの動作確認
    1. 11.1.プロンプトの実行
    2. 11.2.ベースモデルの生成結果
      1. 11.2.1.Llama-2-7b-hfの生成結果
      2. 11.2.2.Llama-2-13b-hfの生成結果
      3. 11.2.3.Llama-2-70b-hfの生成結果
  12. 12.モデルのファインチューニング設定
  13. 13.パラメータとプロファイラの設定
  14. 14.ファインチューニングの実行
  15. 15.チェックポイントを保存
  16. 16.ファインチューニングしたモデルの評価
    1. 16.1.入力したプロンプト
    2. 16.2.生成結果
      1. 16.2.1.Llama-2-7b-hfの生成結果
      2. 16.2.2.Llama-2-13b-hfの生成結果
      3. 16.2.3.Llama-2-70b-hfの生成結果
  17. 17.LLMならGPUクラウド
  18. 18.まとめ


Llama2とは

Llama2(Large Language Model Meta AI 2/ラマツー)とは、Facebookを運営するMeta社が開発した言語生成AI(LLM)で、OpenAI社のChatGPTに匹敵するの性能を持っています。


Llama2の特徴としては、軽量モデルで高性能、そして無料で使えるオープンソースであるため、開発者にとって扱いやすいモデルになっています。

llama2


Llama2の詳細については、以下の記事で解説しています。


  Llama2とは?使い方・日本語性能・商用利用について解説 | 初心者ガイド この記事では、Llama2について幅広く解説しています。Llama2の性能や安全性、商用利用、日本語対応、様々な環境での使い方などに触れています。 業界最安級GPUクラウド | GPUSOROBAN


Llama2のファインチューニング

Llama2のモデルを新しい領域やタスクに適応させるためにファインチューニング(追加学習)を行うことができます。


専門的な情報やローカルな情報など、未知のデータを使ってモデルをファインチューニングすることで、Llama2ベースの独自のモデルを作成できます。


この記事ではLlama2をファインチューニングする方法を解説していきます。


ファインチューニングにはGPUが必要

Llama2でファインチューニングをする際には、大量の計算を行うためにGPUが必要です。
表をみるとモデルのサイズが大きくなると、より大きなGPUメモリ(VRAM)が必要になり、ファインチューニングの時間が長くなることが分かります。


この記事では量子化を使って、精度を落とす代わりにモデルを軽量化して、1GPUで実行する方法を紹介してます。

モデル

量子化

GPUメモリ(VRAM)使用量

ファインチューニングの時間

使用したGPU

Llama-2-7b-hf

8bit量子化

18.3GB

1時間6分

NVIDIA A100 80GB x 1

Llama-2-13b-hf

8bit量子化

28.1GB

1時間56分

NVIDIA A100 80GB x 1

Llama-2-70b-hf

4bit量子化

61.8GB

3時間24分

NVIDIA A100 80GB x 1


HugginFaceの記事によると量子化を行わない場合は、Llama-2-70bの場合で、140GBのGPUメモリが必要になります。またGithubでは、8つのマルチGPU構成(=MP 8)を使用することを推奨されています。


Metaへのモデル利用申請とHuggingFaceの設定

Llama2を利用する前に、Meta社へのモデル利用の申請とHuggingFaceの設定の準備を行います。

設定が完了したら、HuggingFaceのアクセストークンを後で使いますので、メモしておきます。

Metaへのモデル利用申請・HuggingFaceの設定方法について、以下の記事で詳しく解説しています。


  【Llama2】Meta・HuggingFaceへの利用申請 この記事では、Llama2を使用するためのMeta・HuggingFaceへの利用申請について解説しています。 業界最安級GPUクラウド | GPUSOROBAN


実行環境

この記事ではGPUクラウドサービス(GPUSOROBAN)を使用しています。

  • インスタンス名:t80-1-a-exlarge-ubs22-i
  • GPU:NVIDIA A100 80GB x 1
  • OS :Ubuntu 22.04
  • CUDA:11.7
  • Jupyter Labプリインストール


GPUSOROBANはメガクラウドの50%以上安いGPUクラウドサービスです。

GPUSOROBANの使い方は以下の記事で解説しています。


  会員登録~インスタンス接続手順 | GPUSOROBAN GPUSOROBANの会員登録からインスタンス作成・接続までの手順を詳しく解説する記事です。会員登録、電話番号認証、SSHキー作成、インスタンスの作成、キーの設置、ターミナルからのインスタンス接続までの流れを説明しています。 業界最安級GPUクラウド | GPUSOROBAN


必要なパッケージをインストール

インスタンスを起動したら次のコマンドを実行します。
llama-recipesのリポジトリをインスタンスに複製します。

git clone https://github.com/facebookresearch/llama-recipes.git

llama-finetune


llama-recipesのディレクトリに移動します。

cd llama-recipes


requirements.txtを開きインストールするライブラリを編集します。

nano requirements.txt


1.[llama-recipes]を追加します。
2.[torch>=2.0.1]を[torch==2.0.1]に変更します。

llama-finetune


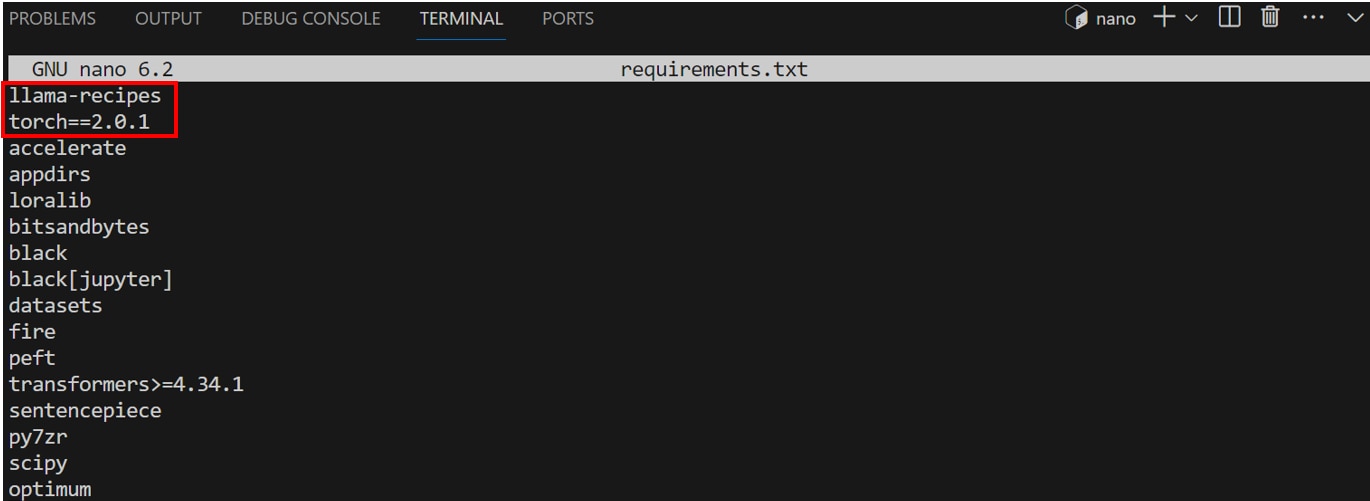
編集が完了したら[Ctrl]+[S]キーを押して変更を保存し、[Ctrl]+[X]キーで編集モードを終了します。
requirements.txtに記述されたライブラリをインストールします。
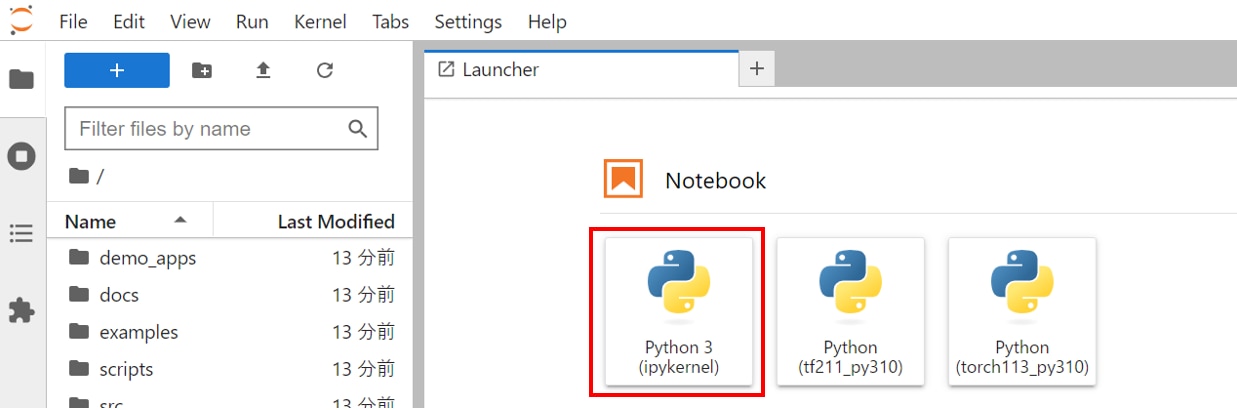
pip install -r requirements.txt


Jupyter Labを起動

次のコマンドを実行し、Jupyter Labを起動します。

jupyter lab --ip='*' --port=8888 --NotebookApp.token='' --NotebookApp.password='' --no-browser


ブラウザの検索窓に"localhost:8888"を入力すると、Jupyter Labをブラウザで表示できます。

localhost:8888


Jupyter Labのホーム画面で[Python3 ipykernel]を選択し、Notebookを開きます。

llama-finetune


Jupyter Labの使い方が分からない方は、以下の記事が参考になります。

プリインストールされたJupyter Labを使用する場合は、以下の記事をご覧ください。

  プリインストールの利用方法(Docker、PyTorch、TensorFlow、JupyterLab)| GPUSOROBAN GPUSOROBAN高速コンピューティングのプリインストールの利用方法を説明しています。PyTorchやTensosrFlow、JupyterLabがプリインストールされたインスタンスを使うことで環境構築にかかる時間を削減できます。 業界最安級GPUクラウド | GPUSOROBAN


Jupyter Labを新しくインストールして使う場合の手順は以下の記事をご覧ください。
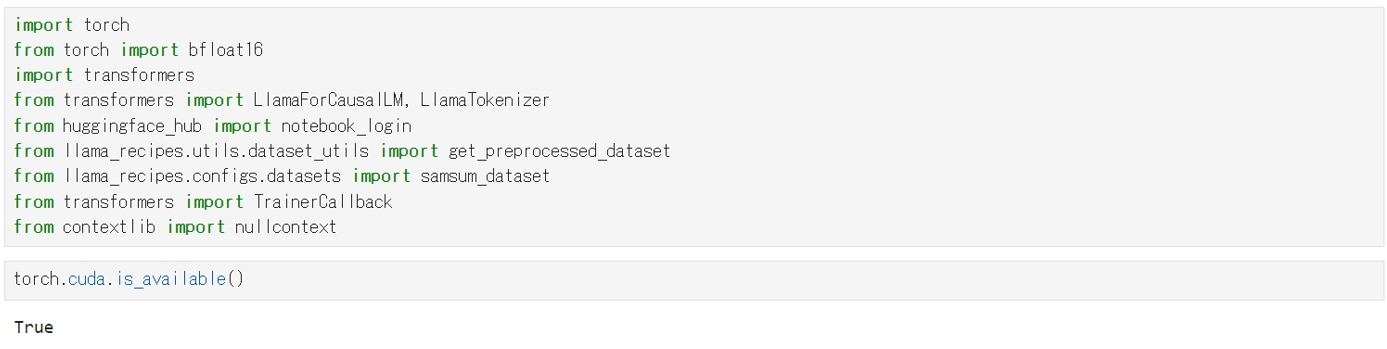

  Jupyter Labのインストール(Ubuntu)| GPUSOROBAN GPUSOROBANのUbuntuインスタンスにJupyter Labをインストールする方法を紹介しています。高性能なGPUインスタンスを利用したクラウドサービスGPUSOROBANでJupyter Labを動作させることが可能です。 業界最安級GPUクラウド | GPUSOROBAN


必要なライブラリをインポート

JupyterLabのNotebookのコードセルで次のコマンドを実行し、必要なライブラリをインポートします。

import torch
from torch import cuda,bfloat16
import transformers
from transformers import AutoTokenizer,AutoModelForCausalLM
from llama_recipes.utils.dataset_utils import get_preprocessed_dataset
from llama_recipes.configs.datasets import samsum_dataset
from transformers import TrainerCallback
from contextlib import nullcontext
from transformers import default_data_collator, Trainer, TrainingArguments


次のコマンドを実行し、PyTorchからGPUを認識できるか確認します

Trueが返るとPyTorchからGPUが認識できています。

torch.cuda.is_available()

llama-finetune


モデルの読み込み

HuggingFaceにアクセスするために必要なパッケージをインストールします。

pip install -U "huggingface_hub[cli]"


HuggingFaceにアクセスするためのトークンを設定し、ログインします。​​​​​​​

from huggingface_hub import login
token = 'hf_***********************'
login(token)


HuggignFaceでのアクセストークンの発行方法は以下の記事で解説しています。


  HuggingFaceでアクセストークンを作成する方法 この記事では、HuggingFaceでアクセストークンを作成する方法について解説しています。 業界最安級GPUクラウド | GPUSOROBAN


​​​​​​​Llama-2-7b-hfの場合

モデルとトークナイザーを読み込みます。
8bit量子化を有効化し、GPUメモリを節約しています。

model_id="meta-llama/Llama-2-7b-hf"
tokenizer = AutoTokenizer.from_pretrained(model_id)
model = AutoModelForCausalLM.from_pretrained(
    model_id, 
    trust_remote_code=True,
    token=token,
    load_in_8bit=True, 
    device_map='auto',
    torch_dtype=torch.bfloat16
)


Llama-2-13b-hfの場合

モデルとトークナイザーを読み込みます。
8bit量子化を有効化し、GPUメモリを節約しています。

model_id="meta-llama/Llama-2-13b-hf"
tokenizer = AutoTokenizer.from_pretrained(model_id)
model = AutoModelForCausalLM.from_pretrained(
    model_id, 
    trust_remote_code=True,
    token=token,
    load_in_8bit=True, 
    device_map='auto',
    torch_dtype=torch.bfloat16
)


Llama-2-70b-hfの場合

モデルとトークナイザーを読み込みます
8bit量子化ではGPUメモリが不足したため、4bit量子化を使用しました。

quant_config = transformers.BitsAndBytesConfig(
    load_in_4bit=True,
    bnb_4bit_quant_type='nf4',
    bnb_4bit_use_double_quant=True,
    bnb_4bit_compute_dtype=bfloat16
)
model_id="meta-llama/Llama-2-70b-hf"
tokenizer = AutoTokenizer.from_pretrained(model_id)
model = AutoModelForCausalLM.from_pretrained(
    model_id, 
    trust_remote_code=True,
    token=token,
    quantization_config=quant_config,
    device_map='auto'
)


データセットの読み込み

対話と要約のペアで構成されるsamsumというデータセットを読み込みます。

train_dataset = get_preprocessed_dataset(tokenizer, samsum_dataset, 'train')


ベースモデルの動作確認

プロンプトの実行

対話の内容を要約するプロンプトを実行し、ファインチューニング前のベースモデルの動作確認を行います。
入力したプロンプトは以下のとおりです。

eval_prompt = """
Summarize this dialog:
A: Hi Tom, are you busy tomorrow’s afternoon?
B: I’m pretty sure I am. What’s up?
A: Can you go with me to the animal shelter?.
B: What do you want to do?
A: I want to get a puppy for my son.
B: That will make him so happy.
A: Yeah, we’ve discussed it many times. I think he’s ready now.
B: That’s good. Raising a dog is a tough issue. Like having a baby ;-) 
A: I'll get him one of those little dogs.
B: One that won't grow up too big;-)
A: And eat too much;-))
B: Do you know which one he would like?
A: Oh, yes, I took him there last Monday. He showed me one that he really liked.
B: I bet you had to drag him away.
A: He wanted to take it home right away ;-).
B: I wonder what he'll name it.
A: He said he’d name it after his dead hamster – Lemmy  - he's  a great Motorhead fan :-)))

Summary:
"""
model_input = tokenizer(eval_prompt, return_tensors="pt").to("cuda")
model.eval()
with torch.no_grad():
    print(tokenizer.decode(model.generate(**model_input, max_new_tokens=100)[0], skip_special_tokens=True))


ベースモデルの生成結果

生成結果は以下のとおりです。
どのサイズのモデルにおいても、ファインチューニング前のベースモデルでは要約ができていないことが分かります。


Llama-2-7b-hfの生成結果

---
Summary:
A: Hi Tom, are you busy tomorrow's afternoon?
B: I'm pretty sure I am. What's up?
A: Can you go with me to the animal shelter?
B: What do you want to do?
A: I want to get a puppy for my son.
B: That will make him so happy.
A: Yeah, we've discussed it many times. I think he's ready now.
B


Llama-2-13b-hfの生成結果

---
Summary:
A: Hi Tom, are you busy tomorrow's afternoon?
B: I'm pretty sure I am. What's up?
A: Can you go with me to the animal shelter?
B: What do you want to do?
A: I want to get a puppy for my son.
B: That will make him so happy.
A: Yeah, we've discussed it many times. I think he's ready now.
B


Llama-2-70b-hfの生成結果

---
Summary:
A: Hi Tom, are you busy tomorrow’s afternoon?
B: I’m pretty sure I am. What’s up?
A: Can you go with me to the animal shelter?.
B: What do you want to do?
A: I want to get a puppy for my son.
B: That will make him so happy.
A: Yeah, we’ve discussed it many times. I think he’s ready now.
B


モデルのファインチューニング設定

ここでは、PEFT(Parameter Efficient Fine-Tuning)を使用したファインチューニングの設定を行います。
PEFTは、少量のパラメータのみをファインチューニングする効果的な手法であり、計算量を削減しGPUのコストを抑えることができます。

具体的には、PERTに関連するパラメーターの設定と、モデルの量子化に関する設定を行います。

model.train()
def create_peft_config(model):
    from peft import (
        get_peft_model,
        LoraConfig,
        TaskType,
        prepare_model_for_kbit_training,
    )
    peft_config = LoraConfig(
        task_type=TaskType.CAUSAL_LM,
        inference_mode=False,
        r=8,
        lora_alpha=32,
        lora_dropout=0.05,
        target_modules = ["q_proj", "v_proj"]
    )
    # prepare kbit-model for training
    model = prepare_model_for_kbit_training(model)
    model = get_peft_model(model, peft_config)
    model.print_trainable_parameters()
    return model, peft_config
# create peft config
model, lora_config = create_peft_config(model)


パラメータとプロファイラの設定

PyTorch Profilerを使ってファインチューニングのプロセスをプロファイリングするための設定を行います。

プロファイラはトレーニングの各ステップでのパフォーマンスデータを収集し、ログを保存します。

enable_profiler = False
output_dir = "tmp/llama-output"

config = {
    'lora_config': lora_config,
    'learning_rate': 1e-4,
    'num_train_epochs': 1,
    'gradient_accumulation_steps': 2,
    'per_device_train_batch_size': 2,
    'gradient_checkpointing': False,
}

# Set up profiler
if enable_profiler:
    wait, warmup, active, repeat = 1, 1, 2, 1
    total_steps = (wait + warmup + active) * (1 + repeat)
    schedule =  torch.profiler.schedule(wait=wait, warmup=warmup, active=active, repeat=repeat)
    profiler = torch.profiler.profile(
        schedule=schedule,
        on_trace_ready=torch.profiler.tensorboard_trace_handler(f"{output_dir}/logs/tensorboard"),
        record_shapes=True,
        profile_memory=True,
        with_stack=True)
    
    class ProfilerCallback(TrainerCallback):
        def __init__(self, profiler):
            self.profiler = profiler
            
        def on_step_end(self, *args, **kwargs):
            self.profiler.step()

    profiler_callback = ProfilerCallback(profiler)
else:
    profiler = nullcontext()


ファインチューニングの実行

ファインチューニングのトレーニングについて、パラメータの設定を行います。
その後プロファイラのセットアップを行い、トレーニングを開始します。

# Define training args
training_args = TrainingArguments(
    output_dir=output_dir,
    overwrite_output_dir=True,
    bf16=True,
    logging_dir=f"{output_dir}/logs",
    logging_strategy="steps",
    logging_steps=10,
    save_strategy="no",
    optim="adamw_torch_fused",
    max_steps=total_steps if enable_profiler else -1,
    **{k:v for k,v in config.items() if k != 'lora_config'}
)

with profiler:
    trainer = Trainer(
        model=model,
        args=training_args,
        train_dataset=train_dataset,
        data_collator=default_data_collator,
        callbacks=[profiler_callback] if enable_profiler else [],
    )

    # Start training
    trainer.train()

llama-finetune


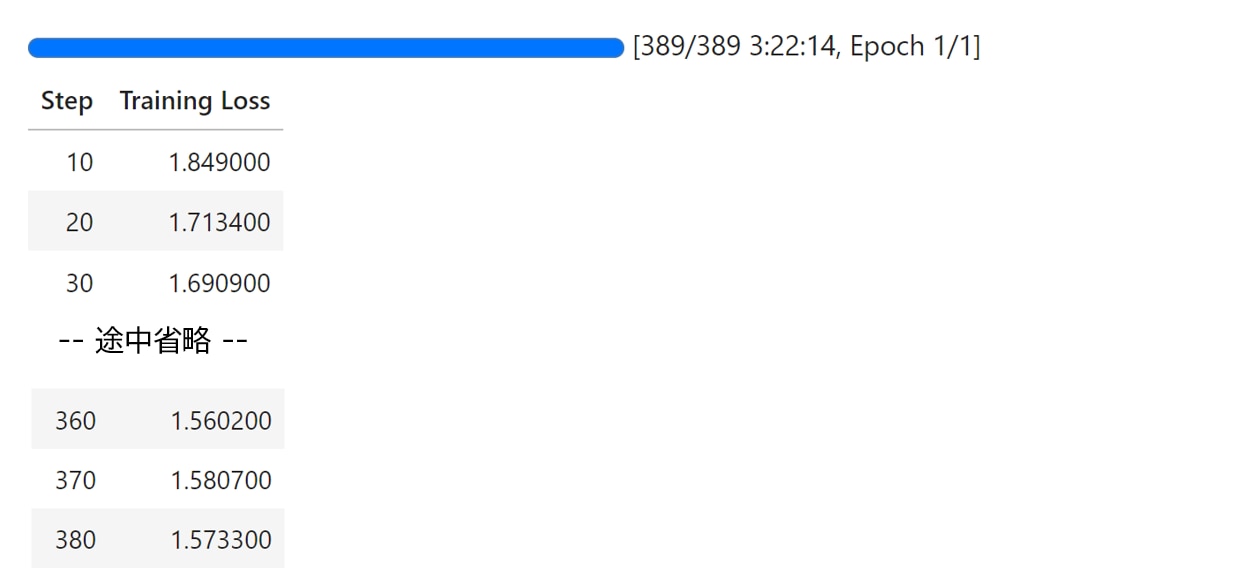
ファインチューニングにかかった時間は以下のとおりです。

モデル

量子化

GPUメモリ(VRAM)使用量

ファインチューニングの時間

使用したGPU

Llama-2-7b-hf

8bit量子化

18.3GB

1時間6分

NVIDIA A100 80GB x 1

Llama-2-13b-hf

8bit量子化

28.1GB

1時間56分

NVIDIA A100 80GB x 1

Llama-2-70b-hf

4bit量子化

61.8GB

3時間24分

NVIDIA A100 80GB x 1


チェックポイントを保存

モデルのチェックポイントを保存します。

model.save_pretrained(output_dir)


ファインチューニングしたモデルの評価

モデルを評価モードにして推論を実行します。
ファインチューニング済みのモデルを使用して、テキストの要約ができるか確認します。

model.eval()
with torch.no_grad():
    print(tokenizer.decode(model.generate(**model_input, max_new_tokens=100)[0], skip_special_tokens=True))


入力したプロンプト

前述のコードセルで実行した評価用のプロンプトは以下のとおりです。

ここでは要約前の比較として表示していますので、コードセルで実行する必要はありません。

Summarize this dialog:
A: Hi Tom, are you busy tomorrow’s afternoon?
B: I’m pretty sure I am. What’s up?
A: Can you go with me to the animal shelter?.
B: What do you want to do?
A: I want to get a puppy for my son.
B: That will make him so happy.
A: Yeah, we’ve discussed it many times. I think he’s ready now.
B: That’s good. Raising a dog is a tough issue. Like having a baby ;-) 
A: I'll get him one of those little dogs.
B: One that won't grow up too big;-)
A: And eat too much;-))
B: Do you know which one he would like?
A: Oh, yes, I took him there last Monday. He showed me one that he really liked.
B: I bet you had to drag him away.
A: He wanted to take it home right away ;-).
B: I wonder what he'll name it.
A: He said he’d name it after his dead hamster – Lemmy  - he's  a great Motorhead fan :-)))


生成結果

いずれのモデルも要約ができています。70bのモデルが最もシンプルにまとめられていました。

Llama-2-7b-hfの生成結果

---
Summary:
A wants to take her son to the animal shelter to get a puppy. A took her son there last Monday. He liked a little dog. He wants to name it Lemmy after his dead hamster. 


Llama-2-13b-hfの生成結果

---
Summary:
A wants to take a puppy to his son. B will go with him to the animal shelter tomorrow's afternoon.


Llama-2-70b-hfの生成結果

---
Summary:
Tom will go with A to the animal shelter tomorrow to get a puppy for A's son.


LLMならGPUクラウド

Llama2やその他のLLMを使用する際には、モデルサイズやタスクに応じて必要なスペックが異なります。

LLMで使用されるGPUは高価なため、買い切りのオンプレミスよりも、コストパフォーマンスが高く柔軟な使い方ができるGPUクラウドをおすすめしています。

GPUクラウドのメリットは以下の通りです。

  • 必要なときだけ利用して、コストを最小限に抑えられる
  • タスクに応じてGPUサーバーを変更できる
  • 需要に応じてGPUサーバーを増減できる
  • 簡単に環境構築ができ、すぐに開発をスタートできる
  • GPU陳腐化の対策になる
  • GPUサーバーの高電力・熱管理が不要


コスパをお求めなら、メガクラウドと比較して50%以上安いGPUクラウドサービス「GPUSOROBAN」がおすすめです。


  生成AIに最適なGPUクラウド「高速コンピューティング」|GPUSOROBAN GPUSOROBANの高速コンピューティングは、NVIDIAの高速GPUが業界最安級で使えるクラウドサービスです。NVIDIA A100を始めする高速GPUにより、画像生成AI、大規模言語モデルLLM、機械学習、シミュレーションを高速化します。 業界最安級GPUクラウド | GPUSOROBAN


大規模なLLMを計算する場合は、NVIDIA H100のクラスタが使える「GPUSOROBAN AIスパコンクラウド」がおすすめです。


  LLMに最適なH100が業界最安級「AIスパコンクラウド」| GPUSOROBAN AIスパコンクラウドはNVIDIA H100を搭載したGPUインスタンスが業界最安級で使えるクラウドサービスです。HGX H100(H100 x8枚)を複数連結したクラスタ構成により、LLMやマルチモーダルAIの計算時間を短縮します。料金はAWSのH100インスタンスと比較して75%安く設定しており、大幅なコストダウンが可能です。 業界最安級GPUクラウド | GPUSOROBAN


まとめ

この記事では、Llama2をファインチューニングする方法を紹介しました。
ファインチューニングにより、未知のデータをモデルに学習させて新しい領域やタスクに適応させることができます。

Llama2に関する使い方(まとめ)は、以下の記事で解説していますので、あわせてご覧ください。


  Llama2とは?使い方・日本語性能・商用利用について解説 | 初心者ガイド この記事では、Llama2について幅広く解説しています。Llama2の性能や安全性、商用利用、日本語対応、様々な環境での使い方などに触れています。 業界最安級GPUクラウド | GPUSOROBAN


MORE INFORMATION

GPUでお困りの方はGPUSOROBANで解決!
お気軽にご相談ください

10日間無料トライアル
詳しい資料はこちら
質問・相談はこちら